Tuesday, April 26, 2011

An Egg-cellent Day

I always keep my eyes open for seasonal milestones. The first leaves that change color in the fall. The first frost, and then the first real snowfall, in the winter. Spring, of course, has many milestones, and one of the important ones is finding the remnants of robin egg shells that have been flung out of the nests by clumsy baby birds.

It was easy to find the nest this particular egg had fallen from. Mama robin had built it a mere six feet off the ground. If you look closely, you can see her protectively huddled over her little ones.

Older nests sometimes fall from the trees. After a particularly windy night, this large nest was rolling around on the ground. Thankfully, it was empty.

Another spring milestone: my creeping thyme has finally bloomed!

It's a really lovely groundcover and even though the flowers are only in bloom for about 3 weeks in the spring, the low-growing green foliage is pretty in the summer, too.

The large lilac bush is in full bloom! Now I'm just waiting on my dwarf bushes to bud out. A solid six weeks of lilacs...I love it!

The fragrant blooms of this crabapple tree are all open, both on the branches, and in a drifting pink carpet below the tree.

The bradford pears are lovely...

...and our Indiana redbuds are providing a nice contrast.

Even my indoor plants are getting in the spirit. I'm terrible with house plants, but was happily surprised to see this cyclamen plant put up a few blooms.

Somehow, I'm even growing mushrooms in my snapdragon box, strange little white umbrellas that unfold and then collapse within a few hours, every single day.

I was motivated to make another Easter project with some of my hollowed-out eggs. I found this idea on the Poppytalk blog and thought it looked like fun.

Make sure your eggs are completely emptied and dried. Take some decorative paper and a hole punch, and punch out several 'dots' from each page.

Paint your egg any color you'd like. After it dries, take a small slip of paper, write your Easter message on it, and roll it up into a tiny scroll. Insert it into the egg through one of the holes you made when you hollowed it out.

Next, glue your dots onto the egg, taking care to cover up both hollowing-out holes.

Attach a card that lets people know what to do with the egg...

...and seal everything up with an Easter-themed stamp.

It was a lot of fun! I'm afraid that I rushed though the first step and my eggs weren't completely dry when I inserted the scroll. Lesson learned!

Besides decorating Easter eggs, I made the traditional hot cross buns to eat with our meal...

...and a new discovery - pavlovas. Pavlovas are a type of sweetened meringue topped with citrus curd, chocolate, or jam, and then smothered in fruit. They were so much fun to make!

Pavlovas
adapted from Good Life Eats
Makes 9 mini-nests


Ingredients
1 teaspoon vanilla extract
juice from half a lemon
2 teaspoons white vinegar
1 1/2 tablespoons cornstarch
1 1/4 cups sugar
6 ounces egg white (from 5 - 6 eggs)

Directions
Let your eggs sit in warm water for about 20 minutes to bring them to room temperature before separating them. While they're warming, preheat your oven to 250 degrees. When eggs are room temperature, separate them and add the whites to your mixing bowl. Mix on low for a minute, and then gradually increase speed.

Meanwhile, mix the sugar and the cornstarch together. Add to the egg white mixture after 2 - 3 minutes, when your meringue develops soft peaks. Increase speed and beat for an additional 2 minutes. Finally, add the vanilla, lemon juice, and vinegar, and beat at high speed for another 2 - 3 minutes, until the meringue is glossy and has stiff peaks.

I should have spooned the meringue into a pastry bag and piped delicate, nicely-shaped birds' nests on my greased cookie sheets. However, I had bread rising, and I was cooking lemon curd on the stovetop, and mixing up sugar cookies at the same time. For expediency's sake, I just plopped soft, pillowy dabs of meringue on my cookie sheet. They looked so pretty...

...but after cooking at 250 degrees for 45 - 40 minutes, they flattened a bit. Well, now I'll know for next time! Even though they were a little flat, they were a lovely color and consistency.

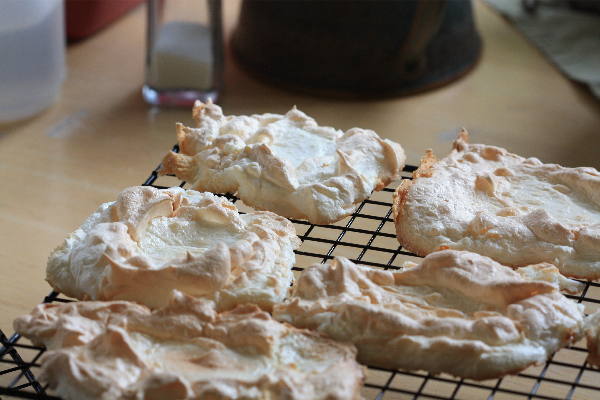
I topped each one with homemade lemon curd and a mixture of blueberries and raspberries. YUM!

We even squeezed in a backyard Easter egg hunt!

It was an EGG-cellent day, indeed, full of good food, good friends, and the knowledge that our Savior rose from the grave on this day, separating life from death and ensuring our salvation.

I hope you had a great weekend, too!

Monday, April 18, 2011

Birthdays and Bouquets

Spring bouquets make me happy.

The lilac bushes are blooming, and I am so glad I got these $7 IKEA vases. Perfect for lilacs. A really nice contrast!

Our viburnum bushes provided this beautiful bouquet.

I just love these delicate pink flowers, and they're so fragrant.

I planted clusters of purple grape hyacinths all over the yard years ago, and I love picking these tiny spikes of bell-shaped flowers to make miniature bouquets.

We have loads of red tulips, and they're nodding on bookcases all over the house.

Even their backs are pretty!

It's hard to be in a bad mood when you've got a house full of fragrant flowers!

With all of this spring spirit, I decided to make some Easter-themed crafts. I've been wanting to utilize my egg cups! This particular project from Martha Stewart is fairly easy - dyed eggs, with plant leaf outlines, nestled in egg cups for display.

First, you have to hollow out your eggs. A little internet research showed many various techniques. There are special tools that will slice off the tip of your egg, and unique syringes that will draw out the insides. Everywhere warned of the dangers of salmonella but honestly, I've been eating raw cake and cookie dough since childhood and I'm still kicking! I decided to do this the old-fashioned way.

I simply cleaned the outside of the egg with vinegar to remove any impurities. Using a basic sewing needle, I pierced a single hole in the pointy end of the egg. Chicken eggs have the thinnest shells of all eggs, and it's quite easy to push the needle through.

At the wide end, make another small hole and enlarge it by picking away at the edges with your needle.

The hole should be wide enough so that some egg white starts to bulge out.

You need a little more force, though. Just put your lips to the pin-hole at the top of the egg and blow. The egg insides will shoot out of the small hole in a steady stream and soon your egg will be hollow.

By the way, don't waste your eggs! Add some cheese, spinach, mushrooms, and onion, and make a frittata. ;)

I sprayed vinegar into the larger hole, swished it around, and blew it out. When no more egg white appears, you're done. Just let the egg dry for a day or two.

There are lots of things you can do with hollow eggs. For this project, I assembled some hollowed-out eggs, cheesecloth, snips of plant leaves, twine, and food coloring.

I used egg white to 'paint' the backs of my leaves and smooth them onto the egg shells. I wrapped each egg tightly in cheesecloth (pantyhose would work as well) to help hold the leaf in place.

I mixed up some dye using vinegar, hot water, and food coloring. Each egg was held in the dye for about 5 minutes.

Then, I peeled off the cheesecloth to reveal the design.

I made 4 eggs this way and was really pleased with the results!

However, they didn't really 'go' with our decor too well.

I ended up preferring an undyed egg from the reject pile. I think it's a little more my style!

Still, it was a fun project and I might do some experimenting to see if I can come up with some more natural colors.

Todd's birthday was this week. Per his request, I whipped up a 3 layer German chocolate cake. It was a little labor-intensive...especially caramelizing the icing...but it was worth it. It was absolutely the best German chocolate cake I'd ever had.

I made a ring of violets on the top to brighten it up a little bit.

I also made an apple pie that was quite delicious. Of course, I skipped the traditional lattice crust in favor of a Star Wars theme.

Yoda has never looked so delicious.

We topped off the day with a surprise party. The birthday boy was completely caught off guard.

Well, you only turn 40 once! :)

In other news, I've finally finished my cardigan. Last week I blocked it carefully...

...and ordered some cool buttons. I originally searched for simple light wood buttons, but was having a lot of trouble finding what I wanted. I decided to go with some vintage metal buttons instead and I'm glad I did. I really like them!

I'd spaced my buttonholes fairly close together and these small buttons were the perfect finishing touch.

I'd made many modifications to this sweater...changed the gauge, lengthened the body, lengthened the sleeves, and raised the neckline. The original neckline was meant to be low enough to sexily slip off one shoulder, but that's not exactly my style.

I'm really pleased with the final result. It was a fairly quick and easy knit.

I'm so glad I got to use my special "snowflake yarn" to make this cardigan. It will be perfect this fall, for chilly morning walks.

Have a great week!

Tuesday, April 12, 2011

Springtime Pasta-bilities

We've had our fair share of sun - and rain - lately. The adage April showers bring May flowers is certainly true, but our March showers have brought us a bounty of blooms, as well.

Magnolia trees are flowering everywhere!

Their delicate pink petals cover the ground beneath the trees. It's so peaceful and almost otherworldly.

Also common in our area are flowering Bradford Pear trees. Even though the blossom smell is a little unpleasant, the masses of tiny white flowers make up for it in spades.

One with a nice smell and clusters of beautiful blossoms is the quince shrub. I've seen these growing wild and also tamed into sculpted bushes, and both look quite nice. A few of these flowering branches in water would make an amazing bouquet!

Of course, one of the most popular trees around here is the redbud. These little flowers are going to pop open any second!

All of the trees are flowering. They make our springtime walks so enjoyable!

Closer to home, we've got real progress. Our viburnum bushes will be in bloom any day, and they have a wonderful smell. The blossoms are tiny and pink - really lovely.

The squirrels have eaten most of our peony bushes, but a few in the front yard survived. This unlikely stalk will be a full-grown bush within a month! Peonies are one of my very favorite flowers and make an amazing - and effortless - bouquet.

Our tulip petals are just starting to open up. We just have a small patch of tulips this year...we're saving our stash of bulbs for our next home!

One of my favorites - the violet - is out. When the grass dries, I'll pick many of these to press and dry for cards in the summer and ice bowls in the winter.

It's almost like we have a violet carpet right now!

Of course, there's the plant whose identity is an absolute mystery. It's a perennial, and it grows about 2 feet tall in the summer. Does anyone have a guess? I absolutely love lime green plants. I have some lime green zinnia seeds that I'm planning on planting this year - I can't wait!

We've had some other surprises popping up lately. Last week I saw not one, but two cats in our pine tree! This is Sylvia...

...and this is Octavio. I don't know who they belong to, if anyone, but I set out some food for them and hope that they stay safe!

My snapdragon seedlings have been growing like crazy. I've told myself over and over that it's perfectly normal - and necessary - to thin them out, but I really don't like throwing any away.

Despite my best efforts to be stern with myself, I ended up repotting about 20 seedlings. If all grow well, we're going to have a snapdragon forest in our back yard!

I tried something new in the kitchen recently. Now, it's no secret around here that I'm coveting the KitchenAid pasta attachment set...the roller, the slicer, and the ravioli stamp. It's also no secret that my husband is ultimately sensible, and said that it sounded like something that we could invest in, but later this year. For some reason, he didn't see the urgency. Sigh...so sensible! I really want the set, so I was a little dismayed to discover how easy it was to make pasta...by hand.

I decided on the spur of the moment to make tortellini a few weeks ago...a little over an hour before supper. I did a little research and saw that most basic pasta recipes are fairly similar.

Basic Pasta

3 cups flour
3 eggs
1 1/2 teaspoons salt
2 tablespoons olive oil
water as needed

Combine your dry ingredients and create a "well" in the center. Add eggs and mix until combined.

Your dough will be really dry, so once the eggs are fully incorporated, add the olive oil and continue to mix. If your dough still seems dry, add a bit of water until you've reached the consistency you want: not sticky or tacky, but not dry, either.

Let your dough rest for 20 minutes under a towel to keep it from drying out. Once it's rested, pull off a portion of the dough, leaving the rest covered. Generously flour your work surface and get your rolling pin out. Roll, roll, roll your dough until it achieves a paper-thin state. It should be nearly translucent. I wanted to tell Todd that this took an hour, but honestly, it just took a few minutes. Although, I should point out that the KitchenAid attachment would've been even quicker! ;)

Once it's rolled out, use a cookie cutter to cut out circles for your tortellini. Quick and easy! Once you've cut up your dough, pull out another piece from the main ball and repeat until all dough is cut. Be sure to keep a towel over your dough circles...they dry out really easily!

Next, choose your filling. I was in a hurry, so I quickly defrosted some spinach and added a pinch of spinach and cheese to the center of each circle.

Wet your finger with a little water and run it along the inside edge of one side of the circle. Then, fold the circle over and press the edges to seal.

To make the classic tortellini shape, just wrap that piece of dough around your finger and seal the edges. Set your sealed tortellini on a plate to dry.

I've heard that pasta should be dried before being cooked. I let my tortellini sit out for about 15 minutes, and that worked out well. Really, your first group of tortellini will be ready to boil by the time you've finished sealing and wrapping your last group.

Then, just boil in salted water for 5 minutes and...you're done. YUM!!

Honestly, I can't believe how easy it is to make homemade pasta, and I know I'll be doing it again soon, KitchenAid or no KitchenAid. Todd couldn't believe how tasty it was...he said that it was the best pasta he'd ever had! And this recipe makes a LOT of tortellini...about a pound. We had a few meals of tortellini with pasta sauce, and then I made a huge vat of spring vegetable soup with the remainder of the tortellini.

You should give it a try...all you need is a little elbow grease and a free hour. You'll be rewarded with an unbelievably tender and flavorful meal.

Good luck!