Many of our spring flowers are going to seed. My columbines, which looked so graceful and healthy last week, are beginning to shed their petals and leave limp, naked stamens drooping in the breeze. The weather has been a real factor in this development. We've had torrential downpours in the last week and several plants have gone under a bit prematurely.

I do like their next stage of development in the seed-forming process. They form little hats that look increasingly...

...like court-jester hats. Minus the jingling bells, of course!

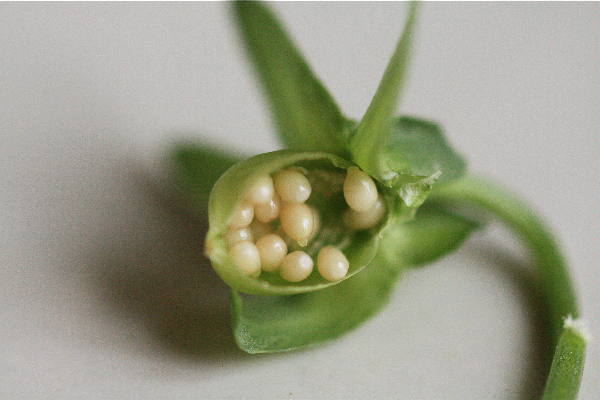
The lovely purple flowers on our sage plants are fast disappearing. Deep in their throats you find tiny, egg-like clusters that will swell and darken before dropping to the ground in hopes of finding a good place to germinate.

My violas are going to seed almost faster than I can deadhead them. I love the seeds, which look like small, creamy pearls.

Pull down a section of the seed pod and you'll see them neatly in a row, like the world's smallest pea pod.

As the spring flowers fade, the summer flowers gather force. This tight green hydrangea cluster will, in a few week's time, be lush, pink flowers.

Three or four months ago, after several nice blooms, I put my amaryllis plant in the basement. Plants like the amaryllis need a 6 - 8 week "dormant period" in a cool, dark place in order to bloom again. I meant to bring it up months ago, but forgot about it. What a surprise to find this ghostly, anemic shoot coming out of the dessicated bulb! I promptly brought it upstairs and repotted it. New life!

Last but certainly not least, the peonies are finally about to pop. Some are just barely unfurling...

...but others are just waiting for a good hot day to really open up. Lush, extravagant, decadent...I am mad about peonies and have had a hard time waiting this year for them to bloom!

Earlier this week, because the weather was so nice, I decided to sit out on the back steps. I haven't taken too many "wildlife" shots so far this year because I haven't really
seen anything. But just a few minutes of sitting quietly, and things began to happen.
Directly in front of me, in the row of columbines along our back fence, I saw a small orb weaver spider making a meal of a gnat.

Taking a closer look, I realized that he'd strung tiny threads of web all around the plants. He snared this little gnat easily.

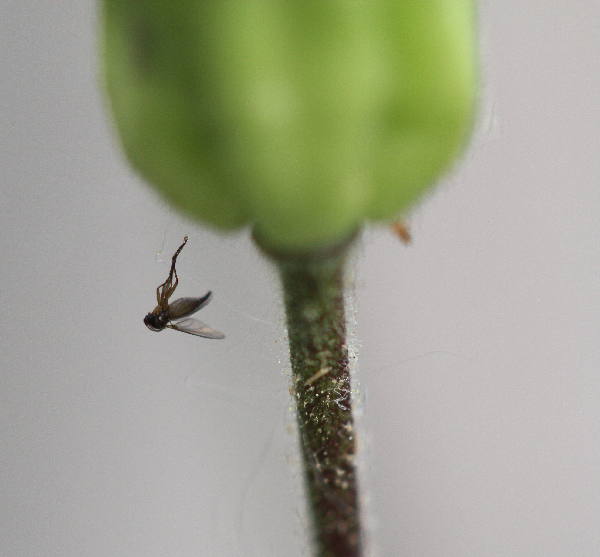
I saw a type of aphid, bustling down a flower stem, looking for the best place to plunge his long, narrow rostrum into the stalk to access the juices.

I was delighted to see a daring jumping spider peeking out from between two fence boards. These are probably my favorite spiders. Not only do they have a cool name, but several distinctive features, as well! They can see better than any other spider and have the ability to jump from ten to thirty times the length of their bodies. Daring jumping spiders also have iridescent green
chelicerae, or mouth parts. You can see them faintly gleaming here.

Another tiny brown spider scurried by my shoe...

...and a leaf hopper dozed on a neighboring plant.

I was impressed by this mosquito that rested on a nearby lilac leaf. It had feathery antennae, which means that this mosquito is male. Male mosquitoes aren't blood suckers. They feed on nectar and plant juices. They use their antennae to attract females. If a female happens to be in the vicinity, to the right of the male mosquito, it will rapidly vibrate its right antennae. If on the left, the left antennae will vibrate. I was hoping to see a live performance, but no such luck.

While examining this mosquito, I heard a loud buzzing. I didn't see anything at first, but then noticed this small hole in a fence board by the back door. You guessed it - carpenter bees.

It wasn't too long before a bee approached the hole...

...and crawled right in. They dig straight back for a bit, and then make a sharp 90 degree turn and burrow to the side. This helps prevent predators from reaching their nest.

Male carpenter bees can't sting, but they are definitely curious of strangers around the nest. He buzzed by several times. So did a hummingbird!
All this activity, in a tiny 4 x 4 square of yard by the back steps! I love our 'wild' back yard. :)
Indoors, Todd has been working on his dissertation and recovering from a tumble on his bicycle...

...Bosewichte has been deciding where to nap...

...and Tabitha has already chosen her spot.

The 'cat' days of summer are almost here!
I've been knitting a bit on a small project, but have nothing to show this week. I haven't done very much cooking, either. Business has been brisk, plus I've had to plant and re-plant in the garden. I've been wanting to post this recipe for a while, though. It's not a light springtime dish, but don't let that stop you from making it. It is delicious!
Stuffed Focaccia with Sausage and OnionsAdapted from The Italian DishServes 6 - 8Sponge1/2 cup warm water
1/2 teaspoon yeast
3/4 cup flour
Dough1 teaspoon yeast
1 cup water
3 tablespoons olive oil
Sponge (see above)
3 1/4 cups flour
2 teaspoons salt
Stuffing2 tablespoons olive oil
1 pound sweet Italian sausage
2 cups sliced onions
salt, pepper to taste
3 cloves garlic, minced
1/2 cup chopped parsley or 1 - 2 teaspoons dried
1/2 cup grated cheese
Don't worry about the many steps here! It goes quickly and it's
so worth it. First, you'll need to make your sponge. Just mix the yeast and warm water together and stir in the flour. Cover with a damp towel or plastic wrap and let rise in a warm, humid place until it has doubled in size, which takes 45 - 60 minutes.
Next, you'll make your dough. To the risen sponge, add the yeast, water, and olive oil listed in the "dough" section of the ingredients. Give it a good mix, and then add 3 cups of flour and, using your dough hook, mix until incorporated. Slowly add the additional 1/4 cup of flour
if needed. Your dough shouldn't be wet and sticky, but it shouldn't be dry, either. It should pull away from the sides of your mixture and be tacky but not sticky. Mix for about 5 minutes and then cover and place in a warm place for about 1 1/2 hours.
When your dough is just finishing its rise, make your stuffing. Add olive oil to a large skillet and cook onions (salted and peppered) until translucent, about 5 minutes. Add sausage and cook until done. Remove pan from heat and add parsley and cheese, mixing thoroughly.
Once your dough has risen, it needs a second rise. Punch it down and split into two even balls of dough. Grease a 9 inch springform pan and spread one dough ball into the bottom of it, making sure you've covered it evenly. Spread onion and sausage mixture on top and then cover with the second ball of dough, spread out into a disc. Cover and let rise for 30 minutes. This is a good time to preheat your oven to 425 degrees!
After the rise, 'dimple' the top with your fingers and top with olive oil, salt, and parsley. Bake for about 3o minutes, until the top is golden.
It almost looks like a very large hamburger...

...but when you cut it open, oh my!

The bread is fabulous, the filling is fabulous, and you don't mind that it took a little while to put together. All it takes is a little planning. You could always assemble the focaccia and meat the night before and the refrigerate. The next day, let it sit out at room temperature for about an hour or so...this is the second rise...and then it will be ready for baking!
I hope you give it a try...it's
so good.
Have a great week!

 Lichen is growing on fallen limbs. This may be a common woodland feature, but it's not something you'd see in our hot, humid area!
 It's really been remarkable. But the old adage does ring true, because the summer flowers are finally starting to show their faces. These feverfew flowers are going to be open in just a few days.
 My achillea plants have woolly, cauliflower-like bunches that will flatten and spread as the tiny flower open. I like them in this state, too!
 I have lots of mallow plants with bright maroon faces.
 The wild strawberries, too, are ripening quickly.
 In the late spring, I will occasionally see spiders, praying mantises, and a rare moth or butterfly, but mostly I see flies. This housefly is sucking up a drop of water left behind after our last rain.
 A small, energetic hoverfly does the same here...
 ...before perching on the pollen-covered stamen of this four o'clock (Mirabilis jalapa). Hoverflies are good to have around and many gardeners plant specific plants to attract them. They love to eat garden pests, like aphids.
 I see lots of interesting flies in the spring, like this small iridescent one.
 Even a common blowfly has an iridescent beauty in the sun.
 The rain has also brought about a much longed-for event...the blooming of the peonies.
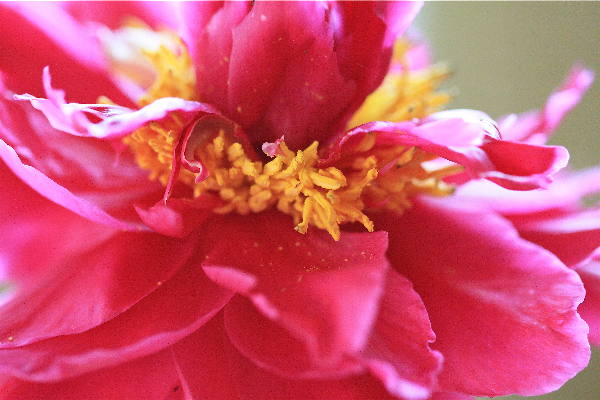 As soon as one bud bloomed, I picked it for a bouquet.
 Small bouquets...
 ...and larger bouquets...
 ...all over the house. Every room was perfumed with their sweet smell, which I much prefer over that of roses.
 Even when they're dying, the petals fade to a pearly pink and retain their charm. I have two glorious weeks with them...until next year.
 Todd and I have been astonished at the healthy green growth of our amaryllis.
 One week ago, it looked like this.
 After just a week, it's grown up tall and green, and one of the flowers opened up.
 An amaryllis bulb can last up to 40 years if cared for properly. That's a real incentive to fill a winter window sill with them! They can be tricked into blooming during the winter if you manipulate their dormant time.
 I've done very little knitting this past week. I was working on a small project that called for pleating a collar. You put 3 stitches on a double pointed needle, then the next 3 stitches on a double pointed needle, and then knit the first stitch from each needle, plus the next stitch in line on your left-hand needle, at the same time. I tried twice and then put it away in frustration. I will try again this week. Not much cooking this week, either. Todd is hard at work on his dissertation and our schedules are turned upside-down during these final days of it. An out-of-state job interview and an upcoming camping trip has added to the chaos. Thankfully, our mid-afternoon naps - and lots of prayers! - help keep our sanity.


