Showing posts with label moths. Show all posts

Tuesday, January 21, 2014

Ginger-snap to it!

The freakish cold spell we've had recently has killed the open camillas and kept us inside on the weekends.  Todd has been busy with our new table saw.  He's built shelves in three closets, in the laundry room, and three series of large-scale shelf-like structures for some of his larger collectible items.  I've never thought much about closets before, but I have to admit that adding shelves (and a coat of paint) has really maximized the space.

Before (a dull yellow):


Todd adding some wire shelving to the wooden supports he'd built:


The final product:


There are also shallow shelves for DVDS going all the way up the left wall.  Amazing!

Meanwhile, since I've been doing daily to-do lists, I've discovered endless small projects.  I've done a massive clothing sort, preparing 6 garbage bags-full for Goodwill.  Found:  some moth-eaten hand-knit gloves.


 Drat!


I've tidied up my sewing machine area and threaded the bobbin, which allowed me to complete a large stack of sewing projects.  I've spring-cleaned the house.  I sorted through 20 magazines, taking articles of interest from each one...


...to be filed into my craft binders.


All kitchen baking supplies have been separated into separate plastic binders and labeled.  All candles have been separated out by type, boxed up in clear plastic shoe boxes, and labeled.  All fabric and kitchen linens have been sorted and labeled.  Holiday boxes have been sorted and organized.  I tell you, to-do lists are amazing!

I did find time to complete a puzzle...


...or two.


I've been buying fresh flowers for my favorite new Emma Bridgewater vase:


...and forcing hyacinths, which I love to do in January.


I've also been baking - a lot.  Unfortunately a corrupted memory card means that I can't show you the chocolate fudge brownies with chocolate chip cookie dough frosting and drizzled chocolate, but I did save the much healthier pumpkin gingerbread tart.  It was delicious - so much better than traditional pumpkin pie.  This recipe is a mix of several other recipes, and a lot of the measurements are "eyeballed".  Here goes!

No-Bake Pumpkin Gingerbread Tart
(heavily adapted from Ezra Pound Cake)

Filling Ingredients
1 cup pumpkin puree
8 oz reduced-fat cream cheese
2 tablespoons butter, softened
1 teaspoon vanilla extract
1/4 teaspoon of cinnamon
1/4 teaspoon of cardamon
1/4 teaspoon of ground ginger
1/4 teaspoon salt
1/2 - 3/4 cup powdered sugar

Crust Ingredients
3/4 - 1 cup gingersnap crumbs
2 - 3 tablespoons butter, melted

Directions
Preheat your oven to 400 degrees.  The pie is not baked, but the crust is.

First, crush your gingersnaps.  I used one whole package of Anna's Ginger Thins, but any type would work.  Add your melted butter and mix with a fork until it holds together and can be pressed down.  Then, add the mixture to your 9" tart pan and press evenly across the bottom and around the sides.


Bake at 400 degrees for 6 - 8 minutes.  Remove from oven and let cool. 

Meanwhile, toss all but the sugar into your mixer bowl and beat until smooth.  Slowly add your sugar.  When everything is combined, spoon into your cooled crust.


Smooth it all out, and refrigerate it for several hours.  You're done! 


 I think it's a lovely dessert.


 I found this clearance glass cake stand at a thrift store for $5.  A perfect excuse to use it!


I used the full 3/4 cup powdered sugar in this one, and I calculated 10 servings at 230 calories per serving.  Not bad at all, although I may have - ahem - cut rather generous portions when I served this.  Anyway, I hope you'll give it a try...it's a nice, spicy treat.

Have a great week! 

Tuesday, August 28, 2012

Ore-oh, yeah!

The recent rains have cooled things off a bit, and I've been more active in the yard.  I've really enjoyed watching the little creatures there...something I haven't done for a while because of the heat.  

Moths are especially prolific in late summer.


There are endless varieties of moths - much too many for me to be able to identify by sight (yet!).  So far I either identify them as "bushy-headed" or "needle-nosed".  This one, of course, is of the bushy-headed variety.  I love the feathery antennae.


It's easy to see them clinging to screen doors and windows, but I can usually find their natural hiding places.  Moths love to hide behind blades of grass...


...or under large leaves, like this "needle-nose".


Of course, we've got the omnipresent carpenter bees, which nap on the Russian Sage at night...


Grasshoppers get bigger, browner, and more sluggish as the season moves on.  They've lost their jaunty hops and seem to have a staring, harassed look.  It's definitely grasshopper mating season.


I've found a few insect nests, too, like this strange marble-sized mud nest built in the branches of our pine tree.  

 
I wonder who lives there?
 
The rains have brought my nasturtiums back from the brink.  I love their bright, saturated colors.


Nasturtiums are edible.  What a beautiful salad they'd make!


I cut back my stocks earlier this year and they've finally rebloomed.


Stocks have an amazing scent.  I planted them along our back walkway so their delicious smell wafts up as you brush past them.   Ahhhhh!


They're annuals, but I believe they re-seed nicely.

My snapdragons have gone strong all summer long...


And believe it or not, one of my lilac bushes is blooming again!


I made the mistake of planting morning glories years ago, and spent the subsequent years ripping up transplants all over the yard.  This year I decided to pot one of them up.  It was an interesting experiment.  I got the same blue flower as the parent plant...


...but the blooms are much smaller.  Also, instead of the large spade-shaped leaves, this plant has jagged, fuzzy leaves of a completely different shape.  


I think I created a monster!  It allows me an opportunity to use one of my favorite words:  transmogrify.

trans·mog·ri·fy [trans-mog-ruh-fahy, tranz-] 

verb (used with object), trans·mog·ri·fied, trans·mog·ri·fy·ing.
to change in appearance or form, especially strangely or grotesquely; transform.


I think it fits!  This is the parent plant's sinister cousin.

Anyway, I can't break my flower-buying habit, but since we're moving soon, I stick to bouquets.


I can't wait to plant rose bushes at our new house!


A friend of mine was recently talking about her love of Newman's Own Oreo-style cookies, and I remembered a recipe tucked away in my collection.  After she left, I pulled it out and preheated the oven.  Could homemade Oreos taste as good as store-bought?

In my opinion - they taste even better.

Homemade Oreo Cookies
makes 16 - 24 cookies
Annie's Eats

Directions
For the cookies:
1¼ cups all-purpose flour
½ cup unsweetened Dutch-process cocoa powder
1 tsp. baking soda
¼ tsp. baking powder
¼ tsp. salt
1 1/4 cup sugar
10 tbsp. (1¼ sticks) unsalted butter, at room temperature
1 large egg

For the filling:
4 tbsp. (¼ cup) unsalted butter, at room temperature
¼ cup vegetable shortening
2 cups powdered sugar
2 tsp. vanilla extract

Directions:
Preheat the oven to 375˚ F and grease your cookie sheets.  In a large bowl, combine flour, cocoa powder, baking soda, baking powder, salt, and sugar.  Add the butter and mix briefly to incorporate.  Next, beat in your egg and mix until the dough forms a mass.  

Take a small ball of dough and roll it into a ball.  Flatten it slightly and place on cookie sheet.  


Bake for 5 - 7 minutes.  Remove from cookie sheet and cool on wire racks.   What a beautiful cookie!


While they're cooling, make your filling by combining your butter and shortening and beating until smooth.  Add your powdered sugar and beat 2 - 3 minutes, then blend in the vanilla.  **My filling seemed too thick to pipe at this point, so I thinned it out with some milk.  It was still quite thick!

 For cookie assembly:  pair up your cookies by size.  Fill a pastry bag with cookie filling and pipe frosting onto one cookie half.


Put cookies together and press so that filling is evenly distributed.


This recipe makes some gorgeous stacks of cookies! 


They taste like Oreos, but are softer in the middle.  They are amazing and I'm sure I'll never buy store-bought Oreos again.  They didn't take any time to whip up, either!  Truthfully, you can cut the sugar down quite a bit in this recipe and still have a great-tasting cookie.  I feel great about adding this to my roster of kitchen DIY recipes, and I love having the excuse to say:  Ore-oh, yeah!  :)  

Hope you give them a try.  Have a great week!

Monday, September 12, 2011

Fortune Cookie Rookie (no more!)

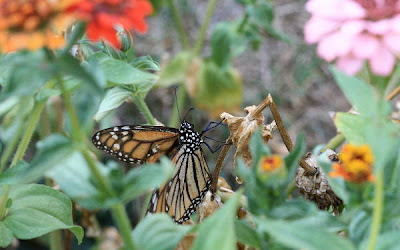
Finally, we've got monarchs in the garden this week.

Todd and I saw one freshly hatched from its chrysalis on a walk the other morning. Talk about fresh, vibrant colors! But many of the ones I've seen are older. This monarch has probably been alive for a couple of weeks. He has telltale tears on his wings, and many of the tiny feathers that cover his wings have flaked off, leaving dull, gray spots.

Older butterflies are a little more devil-may-care than the younger ones. They don't mind sitting on my fingers, or letting me get close while they feed.

I love their delightfully spotted bodies! God had fun making butterflies, I'll bet.

The older ones aren't as buoyant as younger ones. This monarch had multiple tumbles from flowers, but he always patiently climbed back up to the bloom to feed.

Another winged visitor this week: a beautiful moth resting on our screen door.

Identifying moths is difficult, because they are so numerous, and so many of them happen to be brown. But I still enjoy studying their markings. Don't they have lovely designs?

A common buckeye (Junonia coenia) stopped by for some nectar. They look interesting with wings closed, but...

...they are much prettier with opened wings!

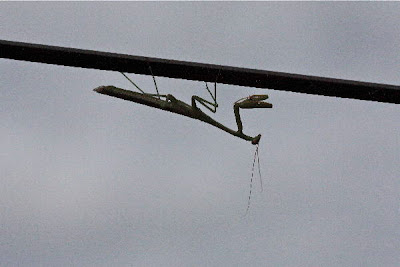
Recently, I was eating supper in our little sun room and idly surveying the back yard. On a low wire running through our pine tree branches, I saw a familiar silhouette:

A mantis was poised in "attack position" directly over the web of a small orb weaver spider. The spider tidied up his web, seemingly oblivious of the threat. Do mantises eat spiders?

Oh, yes, they do! Mantises eat all forms of insects, bees, and spiders. Oh, and also small birds and reptiles...if they can get them! I'm telling you - these things are dangerous! :)

Even though I had planned on taking it easy with knitting this year, I feel like I've got an unusually high amount of projects on needles. I like doing small projects in between the big ones, because I need that instant gratification. I recently completed a really fun project...a bookmark.

With a tail.

Squashed, with a tire-tread back.

And a lolling tongue. And, in case you still weren't sure...X's for eyes. Yes, this is one dead rat.

He was so much fun to knit! The pattern was easy...a simple 2-needle cast-on (using Judy's Magic Cast-On), a few increases, a bit of embroidery, some polyfil, and then a simple garter stitch body. I used teeny pink i-cords for the feet and tail.

I don't need to crack open a fortune cookie to know that there are many more of these in my future!

Of course, just in case I wanted to stack the odds...I happen to know how to make fortune cookies. They're easy, and fun, and great for almost any occasion...Valentine's Day, a birthday, an exciting life event, or...just because. Would you believe they only contain four ingredients?
Now there's really no excuse not to try them!

Fortune Cookies
Makes 12 - 20 cookies
Annie's Eats


1/2 cup all-purpose flour
1/2 cup sugar
1 teaspoon vanilla
2 egg whites

Whisk all ingredients together until well-blended and then chill for one hour. Meanwhile, preheat your oven to 400 degrees and write out your fortunes!

When your batter is chilled, spoon out 1 teaspoon of it onto a greased cookie sheet and spread it into a 3- or 4-inch circle. I made my cookies a bit too big and they didn't fold as easily as they would have if smaller. Lesson learned! Only put 3 or 4 circles on your cookie sheet. They harden quickly after baking, so if you have more than 4 cookies waiting to be shaped, there's a good chance that they'll harden before you've got time to shape them. Don't worry...if they do harden, you can heat them up in the microwave for a few seconds to soften them.

Here's where the fun begins! Bake for about 5 minutes, until they've just gotten a golden edge.

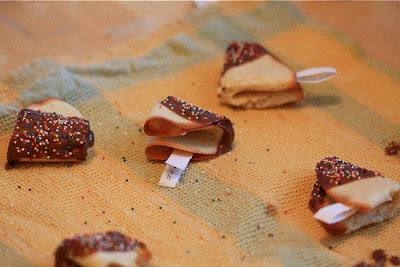
Working quickly, remove your cookies from the cookie sheet and flip them over. Lay a fortune inside...

...fold them in half...and fold them over the edge of a bowl to harden. Because mine were a little too big, I ended up placing them on a clean cloth and resting a spoon against their tops to hold them down while they hardened. Either way will work!

Look! You just made fortune cookies! Repeat with remaining batter and let cookies cool. You can give them away in their current state...

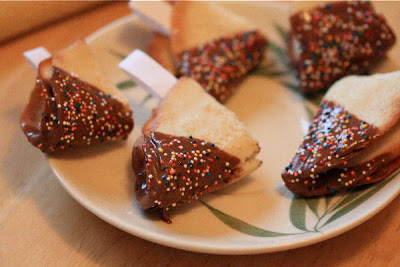
...or, you could dip them in chocolate and cover them with sprinkles, which is my preference.

The chocolate hardens quickly, and then they're ready to give!

Your recipient will be "fortunate" to receive such a fun gift!

I hope you'll make some this week. Enjoy!