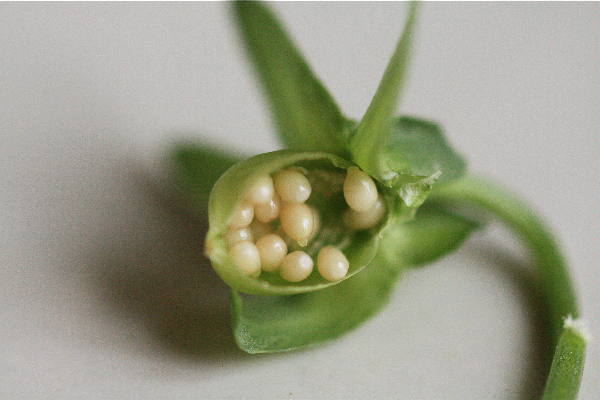
The flower head at the top of the stalk split open, revealing the tightly-furled flowers within.
 They pushed up...
 ...and started to open.
 Before long, they were all in glorious bloom. And the smell was amazing!
 The columbines, too, followed a similar path. The soft green flower heads thickened and pinked up...
 Then, having obtained the right shape, nodded over...
 ...and started to open.
 Beautiful!
 I just love seeing the columbines en masse. I grew them all from the same small batch of seeds, but the backyard columbines are mainly pink.
 However, I started a line of columbines along the front of the house, and they're purple with a pansy-like face...completely different from the backyard columbines.
 They can even be grown in containers. I've got them mixed in with some lilies here.
 It's been warm, and then cool, and then warm again, but fairly dry. Finally, we had a really good rain.
 Just what my parched garden needed.
 These are the last of the early-blooming lilacs. It's perfect. Just as they're dying off...
 ...the late-blooming lilacs burst onto the scene.
 I almost prefer these for bouquets, because the flowers are a bit smaller and remind me of heather...and the colors are a lot deeper.
 Here's a side-by-side comparison...you can really see the difference between the two types!
 I bought this tiny glass vase at Goodwill for .50. Perfect for this type of lilac with shorter stems.
 Of course, I put them in bigger vases, too!
 All sorts of things are budding out. I discover new things every day. My sage is getting ready to bloom. I should pinch off these buds and cut back the new growth to encourage a bushier, more compact plant, but I love to see it growing wild and sprawling over our walkway.
 Salvia is getting ready to open up...
 ...and my low-growing geranium plants are blooming beautifully!
 I have a tall mystery plant ready to bloom. I think it's a weed...but I'm going to wait and see what the flowers look like!
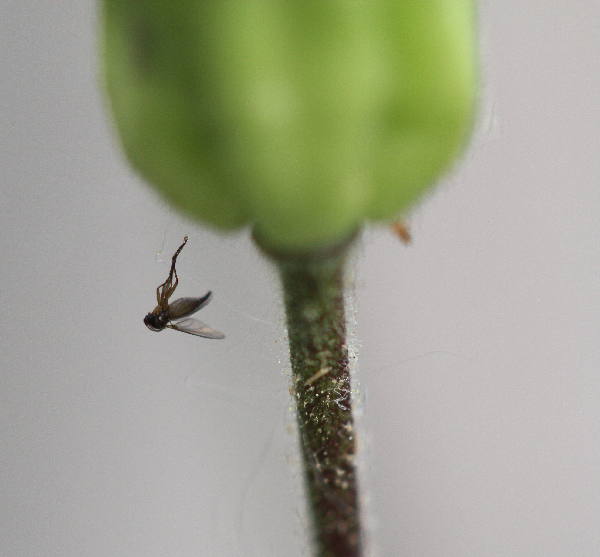
 I also saw some tiny acrobats out in the hydrangea bushes. Teeny tiny spiders balancing on silken threads. They were completely immobile...
 ...except for one little spider, who was shakily making his way from leaf to leaf.
 I saw a black stripe on their abdomens. Oh, how wonderful if they are garden spiders! I'll have to wait and see. Meanwhile, I saw this crab spider nestled in the tightly-coiled buds of one of my hydrangea bushes.
 I was really gratified to see those buds on my smallest bush. I bought it at least 7 years ago, just a small hydrangea start. Each year it leafs out, but no blooms. I can't wait to see what color it is!
 I haven't just been in the garden. I've done an extraordinary amount of baking lately, but I just haven't had time or space to post a recipe. This recipe, though, is exceptional. It's one of the best non-chocolate desserts I think I've ever had...and it's so easy! I mainly chose it to try because I wanted to use up some ingredients in my kitchen...that forgotten jar of jam in the back of the refrigerator, those slivered almonds left over from Halloween's witch fingers, the last of the oatmeal. I didn't expect those leftovers to create such a tasty treat!
Almond Jam Squares
modified from Farm Girl Fare
Ingredients
1 cup butter, softened
1 cup packed light brown sugar
1/2 cup granulated sugar
2 eggs
1 teaspoon vanilla extract
3 cups flour
1 teaspoon cinnamon
1 teaspoon salt
1/2 teaspoon baking powder
1 1/2 cups sliced or slivered almonds
1 1/2 cups jam
1/2 cup old-fashioned oats
Directions
Preheat your oven to 350 degrees. Cream your butter and sugars well, and then beat in your eggs, one at a time. Beat in vanilla.
In a separate bowl, combine flour, cinnamon, salt, baking powder, almonds, and oatmeal. Gradually add to the butter mixture and mix until just combined.
Split your mixture in half. Press half into the bottom of a greased 9 x 12" pan. Heat the jam of your choice in the microwave until it's nicely spreadable. Pour on top of pressed mixture and spread evenly, and then sprinkle the remaining mixture on top. Bake for 30 - 40 minutes, until top is golden.
It's easy to "lighten up" this recipe. I cut it in half and used much less sugar than the recipe called for. I also used whole wheat flour (note: recipe, cut in half, baked for about 20 minutes).
 The possibilities are endless here. If you don't like jam, consider using cherry pie filling. Or saute apple slices in cinnamon, sugar, and vanilla until soft, and then layer in between crumble layers.
 These are healthy, gooey, soft, and delicious. I highly recommend them! I hope you can bake them this week!
Enjoy!