Tuesday, July 3, 2012

plum crazy over bundts

When you have temperatures in the 100s for several days in a row, and no end in sight, you can't help but feel a little lethargic after a while.  Todd and I find ourselves wilting by early afternoon and have succumbed to daily naps for fortification.

We aren't the only ones drooping.  Upstairs it's hot...


...and downstairs it's hot.


And, of course, it's hot outside.  Todd thought this spread-eagled squirrel was dead at first.  No, just passed out from the heat on our front steps.  Poor little guy!


The extreme temperatures are forcing some things to go to seed prematurely, like my larkspur.


Larkspur seeds are tucked tidily into long, narrow pods...


They don't release easily, but it only took me 30 minutes to empty my collected pods into a plastic bag for next year's sowing.


My Bells of Ireland finally got over their weak-stemmed start and have grown tall and strong.  I like Bells of Ireland because of their unusual look and their color.


Another great them about them is how easily water collects in the flower reservoirs.  This is perfect for insects suffering from the drought. 

We seem to have a yellow jacket nest in the yard somewhere, because they're always around, taking advantage of the water I spray on leaves and flowers...


...and in the bird bath.


As a matter of fact, I've noticed something strange this summer.  Almost no grasshoppers, spiders, katydids, or butterflies in the yard like a normal year, but lots of bees and wasps.  Strange.  Still, I enjoy the daily acrobatics of the carpenters bees...


...and the honey bees.


Another strange thing with our hot weather:  the fruit trees are ripening prematurely.  My friend's plum tree is dropping plums faster than she can pick them.  I picked for just a few minutes and came away with ten pounds of ripe plums.


Plums have such a pretty color.


I liked having the plums sitting around, looking pretty...


...but when it came to actually cooking with them, I balked.  I had planned to make a big batch of plum jam, but it took so long to peel and pit each plum.  I ended up making a plum crisp and giving most of the rest away.

I recently tried a project I'd read about on-line.  I always need more plant stakes because mine get faded, lost, or broken.  I found a way to make my own easily.

First, I gathered up some rubber stamps.


I bought some polymer clay - the kind you bake. 


With my coupons, I was about to get a 2 pound box for just over $5.  Score!!  It only took two small sections of Sculpey to make my tags.


Sculpey has a stiff, plastic feel to it.  You have to break it off in small pieces and manipulate it with your hands.  Soon it will loosen up into a Play-Doh-like consistency.  I rolled mine out and used a pizza cutter to make rows.


Then, I stamped the plant names firmly into the clay.


I used the pizza cutter to make pointed bottoms - easier for sticking into the dirt.


Then I baked them at a low temperature for a few minutes.  They weren't rock-hard like I expected, but I think it's good that they've got a little bend to them...they won't break as easily.

I had so much fun playing with Sculpey that I quickly stamped out a little tag for a friend's son that has just discovered Bon Jovi.  He's home by 4 p.m., hence the clock:


I'm knitting again, too, but don't have anything to show quite yet!

Despite the heat, I've been baking a lot, and it's because I discovered the Back in the Day Bakery Cookbook.  Lovely old-fashioned sugar- and fat-laden recipes from a Savannah bakery.  I've made three desserts from the cookbook, each better than the last. Trust me - these desserts are amazing.  The one I'm showcasing today is a brown sugar bundt cake with a kind of caramelized brown sugar glaze.  I made it for Todd, but my sister and I ended up cutting into it hours before he came home and proclaimed it the best bundt cake ever.  Sweet, rich, and with a slight kick from the cardamom...sigh!

Brown Sugar Bundt Cake
very slightly adapted from Back in the Day Bakery Cookbook
Makes one bundt cake

Ingredients
2 1/4 cups flour
1/2 teaspoon baking soda
1/2 teaspoon salt
1/2 teaspoon ground cardamom
2 sticks of butter (1 pound), slightly softened
2 cups packed brown sugar
1 teaspoon vanilla
3 eggs, room temperature
1 cup nonfat vanilla Greek yogurt

Glaze
7 tablespoons butter
1 cup packed brown sugar
1 cup heavy cream

Directions
Preheat your oven to 325 degrees.  Grease and flour a ten inch bundt pan and set it aside.  Cream sugar and butter together until whipped, about 5 minutes.  Add eggs one at a time, beating after each addition.  Beat in vanilla.  In a separate bowl, mix dry ingredients together and add to butter mixture, alternating with the Greek yogurt, and mix for an additional minute.

Fill bundt pan with mixture and tap firmly to ensure that you don't have any air bubbles.  Bake until golden brown, about an hour.  After it's done, let it cool in the pan for 15 minutes and then remove from pan and let cool on a wire rack.

While it's cooling, make your glaze.  Mix glaze ingredients together in a sauce pan and bring to a simmer.  Whisk steadily until mixture thickens a bit.  For me, that took around 15 minutes, and it was still quite thin.  Don't worry, it will thicken more after you remove it from the heat.

Ladle over cake...


Cut a slice...


...and prepare yourself for a little piece of Heaven.

Hope you'll try it this week - it's worth turning on the oven for!


Tuesday, June 26, 2012

Drought Pout

We're in the middle of a drought here in Indiana.  We haven't had any rain for two months...meanwhile, the temperatures have climbed into the mid to upper 90s.  It is hot.

This is our 'second' living room, which serves as our bedroom in the summer.  For reasons unknown, the A/C vent in the master bedroom upstairs was filled with cement before I purchased the home, so it is very hot up there in the summer.  The other bedroom is also upstairs, and the downstairs bedroom has been turned into Todd's study.  So, with upstairs temperatures reaching into the 90s by July, we drag our mattress downstairs and recline in the blissful A/C.  "The kids" love it and maintain a near-constant state of drowse nearby. 


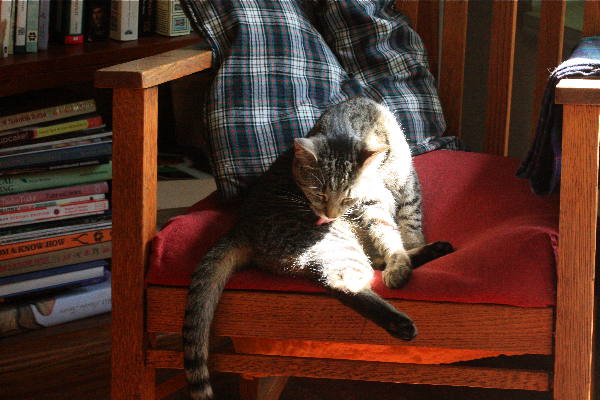
 Tabitha in particular loves it when we move downstairs.  Instead of sleeping in the windowsill above our heads like she does when we sleep upstairs, she claims the chair next to the bed and spends 90% of her time there (the other 10% is spent at her food bowl).

She grooms...


  Tidies...


...and then goes back to sleep.  Repeat as necessary.


The garden suffers in the heat.  We water for 30 minutes a day, but some things just can't handle the heat.

Our hydrangeas are crisping up...


...and our creeping thyme has broad swatches of brown.


The grass is...dead.


In this heat, some container plants need to be watered twice a day.  Sometimes I just don't get to it.


We exercise and run errands in the morning, and by the time we get home, it's just too hot to weed.  The hot weather keeps some weed growth down, but we're seeing a lot of this in the cracks of our sidewalk and patio:


It's not all bad, though!  Living in Indiana, I knew I had to prepare for this type of summer.  With heavy clay soil and frequent droughts, you have to plan accordingly.  Portulaca (moss rose) always grow well in the heat.  It's a type of succulent, and flowers in a variety of bright colors.


Herbs usually grow well when it's hot.  I'm growing chives, dill, catnip, mint, sage, lavender, and basil.


You can't beat zinnias for hot-weather flowering.  I didn't plant too many this year, but I've still got a nice group of them!


Cosmos grow well in the heat, but have to be frequently deadheaded.  If you're up for the challenge, go for it!  This year, I grew light pink cosmos...


...hot pink cosmos...


...and orange cosmos, which haven't bloomed yet.

In the area bordering our back slab,  I planted two other heat-lovers in mixed groups:  white geraniums and yellow osteospermums, which are a type of miniature sunflower.


They are unfailingly cheerful!

In the impossible-to-kill category falls Russian Sage.  From June to frost, it blooms in fragrant, purple spikes.  I planted Russian Sage years ago and the bush is now huge!


No one loves Russian Sage more than bees.  My bush is absolutely bee-covered...carpenter bees, honey bees, and other mysterious flying creatures that congregate to gather pollen.


Oh, we've got one other sun-lover:


All in all, I'm not really pouting over the drought.  Every gardener knows that sometimes you've just got to go with the flow and hope for better weather next year!  As long as I'm still able to pull enough flowers every week for my bouquet spread...


...although these beauties came from Marsh, not from my yard.  Aren't they beautiful?  Sigh!  I love peach roses.


Some purple Russian Sage and white Queen Anne's Lace really set them off nicely...all ready for the table!


I made something a little unique recently.  Normally I restrict myself to one sweet dessert a week, but I'm always casting about for that magic dessert that's virtuous enough to be consumed daily.  I had high hopes for this high-protein treat, but I just couldn't get past the fact that I was eating - beans.  Yes, these are the notorious Black Bean Brownies of circa-2000 Weight Watchers fame, made without a brownie mix.  You read the ingredient list right...these chocolate brownies are made with black beans and without flour.  

Black Bean Brownies
from allrecipes.com

Ingredients
1 15.5 ounce can of black beans, rinsed and drained
3 eggs
3 tablespoons vegetable oil
1/4 cup cocoa powder
1 pinch salt
1 teaspoon vanilla
3/4 cup sugar
1/2 cup chocolate chips (optional)
1 teaspoon instant coffee (optional)

Directions
Preheat your oven to 350 degrees and grease an 8 x 8 baking dish.  Place all ingredients into your blender.


Blend well (gag):


Pour into baking dish and bake for 20 - 25 minutes, until edges are browned.

Here's the deal on these brownies:  they look like regular brownies, but the texture is light and whipped, almost like mousse.  You truly can't taste the beans, but there is a bit of a strange, almost tangy taste that didn't appeal to me.  To help, I made a quick cream cheese frosting for the top and made sure to chill these well before eating. 


I would say that if you're trying to avoid flour, these are a fair brownie substitute.  My husband really liked them, but as I was watching the beans whirl around in the blender, I was already thinking:  this is not a good idea.


But maybe you aren't as fussy as I am!  It's worth a shot...give it a try this week!


Monday, June 18, 2012

Whole Lotta Love

Things I'm loving this week...cupcakes for two, with sprinkles...that we've had three days in a row.


Pollen-covered bees.


Tiny bouquets made up of flowers from the garden.


"Things" that resemble other "things", like seed pods that look like pointy-hatted gnomes...


 ...and this emerging fennel umbel that resembles an acrobat, twisting backward to grasp a pole.  Do you see it?


Also love...flowers grown from seed.


Color...lots of color.


When a plan comes together...like a walkway bordered by feathery cosmos that are just starting to open up.  


Yard sales steals...like this handmade miniature covered bridge I found for $5.00.


I love doll-free dollhouses and the tiny wooden furniture inside.  One day I will indulge that love, but for now I'll stick to this miniature covered bridge, which may become a trailing shade plant holder, or a bird feeder...or maybe just something to sit on a shelf and admire.  It's got both puppy and kitty seals of approval.


Another $5.00 steal...this was the price for three vintage wooden dough bowls found at Goodwill recently.  Not $5 each...a total of $5 for all three bowls.


They were in pretty rough condition.  Lots of scratches.


Because my arms are usually aching from the gym, I slowly sanded them down over time.


Then I used mineral oil to bring out the natural beauty of the wood.


It's a beauty, isn't it?  I found other, nearly identical vintage wooden dough bowls online ranging in price from $35 - $250 -  per bowl.  

In the midst of so many good deals, I've been feeling a bit guilty for paying full price for some items that I don't even use...like my tart pans.


I decided to make mini fruit tarts this past week, to assuage my guilt...and because they're so tasty.  I don't use a set recipe for these...it all depends upon what you like.

I mixed up my preferred recipe for pie dough (Smitten Kitchen's all-butter pie dough) and placed the  dough in the refrigerator to chill.  I preheated the oven to 350, greased my tart pans, and placed them on a cookie sheet in case of mid-cooking spillage.


Once my dough was chilled (to be honest, I only chill mine for 15 - 30 minutes), I rolled it out on a floured surface and used a tart tin to cut out the pie bottoms.


Of course, this only makes enough dough to cover the bottom of your tins.  


I took leftover dough, sliced it with a pizza cutter, and made sides for each tart.  


An alternative is to just cut a larger circle of dough that covers bottom and sides all at once.  That's the easiest way...I just wasn't thinking when I was making these!  But this method worked just fine and didn't take much more time.  

This is just a miniature version of my favorite three-berry pie.  I measured about 3/4 cup sugar and mixed in 2 tablespoons of corn starch.  I stirred this mixture into 3 cups of frozen fruit, and spooned it into my tart containers.


Since I just threw these together, I didn't pay much attention to time...I just baked these until the crusts were golden...around 20 minutes, I think!  

The tarts are a bit runny when they come out of the oven...


...but they firm up as they cool.


These can be whipped up in no time and it's a perfect summer snack.  Great for picnics!  Each tart is equivalent to a half piece of pie, so it's a small, guilt-free indulgence.


Enjoy!