Showing posts with label creeping thyme. Show all posts

Monday, March 21, 2016

Don't Fence Me In

A little section of side yard just off the master bedroom is fenced in.  I have to tell you, it was a fantastic idea.  The former owner poured concrete for a small patio and put up a little white picket fence.  Carolina jessamine vines over it in the spring, and it's full of hostas and ferns in the summer.  Just perfect.


Except...that strange storm last year, the one that cracked 5 of our big trees and necessitated their cutting down, also tore up the fence.  Fence came down, deer came in, and the hostas were no more.   What a mess!


 Now that it's spring and warmer weather, it's time to fix the fence.  First, Todd pulled out the old fence slats, carefully removing them from the encircling vines.


Next, we used a big, unwieldy drill for the new holes. 


 The perfectionist.


It won't be done until next weekend.  Todd wants to build the fence higher and a pergola somewhere - I'm a little fuzzy on the details - so I'm not sure what the final look will be.


Meanwhile, I spread mulch for days.  Bosewichte loved helping.


A great helper with the groundcover I bought!  A steal...14 pots of creeping thyme, normally $7 each, on clearance at Lowe's for $1 each.  I had a huge patch of this in our Indiana yard and loved to see it bloom in the spring.  It's great groundcover.


Everything is so GREEN!


The camellias are about done for the year, so I'm out almost daily, getting the very last ones for bouquets, along with the azaleas.


We've has some beautiful sunsets...


...and some great Scrabble nights by the pond.


It's been so busy that I've barely had time to do any crafting, but I did sew a quick 12" quilt block in summer colors.


I embroidered a few butterflies for practice.


Somehow they looked good together, so I'm going to display them side by side, somewhere around here.


My quilting class through Anderson University's LLI is starting again.  I had to choose colors for a lap quilt, and was inspired to choose spring colors.  I don't normally like purple, but somehow these seemed to go together.  I want to get out of my color comfort zone, too, so these are perfect.


Hopefully they come together well.  It's a quilt-as-you-go quilt, so all the pieces are already cut out and ready to go.  Each block will be sandwiched together, backing and batting included, and quilted in one fell swoop. Then you simply sew the quilted blocks together and voila, you have a quilt!  Fingers crossed that it goes well.

Happy spring! 

Monday, May 16, 2011

Purple Reign

It has occurred to me, belatedly, that I've got an awful lot of purple in my garden.

My dwarf lilac bushes have bloomed and it's a pretty dazzling display, even though the bloom time of these flowers is much shorter than that of my full-size lilacs.

I love the light purple undertones on the creamy-white blossoms.

My yellow irises haven't bloomed yet, but the purple ones are up all over the yard!

The columbines are still going strong...

...and while my white phlox isn't quite ready to bloom, the purple phlox is glorious.

There are still a few purple flowers on my creeping thyme, too.

The sage has bloomed, with open-throated flowers that bees love to visit...

...and my salvia is open for business, too!

I don't mind having so much purple in the garden. To me it's a great restful color, and perfect for spring. I save the pops of color for summer!

Still, to break things up a little, I've put in a little color here and there. These geraniums brighten up the corners of our back walkway, and draw attention away from our too-long grass. Yes, we're mowing this week! :)

I am absolutely entranced by the velvety wonderful-ness of celosia. A neighbor has full-size celosia in a dramatic maroon color with a flower head as big as a dinner plate. I am in love! I spread several of these around...they look nice with purple and provide a little burst of color in unexpected places...which I love.

No vegetables this year. I'm slowly filling our containers with colorful annuals, in case we do put our house on the market soon. I'm not a big fan of these types of plants, but they'll be fine here for now.

I'm preparing to move some succulents outside. I got a big bunch of hens and chicks at church on Sunday and am scouting around for a good place to put them!

Seedlings are popping up everywhere. Zinnias, of course, are nearly guaranteed to grow...

...and I'm pleased with the sheer volume of cosmos coming up, too. I've got light pink and cream cosmos in some parts of the garden, and more dramatic orange in other parts.

I have a few more patches of seeds to plant but I'm waiting for this cold patch to pass.

This little squirrel is waiting, too...waiting for a nice meal.

He scouts around for a good location...

...and begins to dig.

Success! I love watching our backyard wildlife, even if we've just got squirrels right now.

I've been so busy in the yard and with our business that I haven't had much time for other projects. I've carved out a little time for knitting, and have completed a surprise gift for a friend...which can't yet be posted. I'm working on a new project now, which is also...a surprise. I will try to squeeze in some not-so-secretive things soon, though!

I've still been baking, but not nearly as much as before. Still, I had time to try out a new recipe recently. Chocolate cookies, with a little surprise inside! Basic, tasty, and quick...just what I needed.

Chocolate Surprise Cookies
From Sweet Pea's Kitchen

Cookies
1 1/2 cups flour
1/2 cup unsweetened cocoa
1/2 teaspoon baking soda
1/4 teaspoon salt
1/2 cup brown sugar, packed
1/2 cup white sugar
1/4 cup creamy peanut butter
1/2 cup butter, softened
1 teaspoon vanilla
1 egg

Filling
3/4 cup creamy peanut butter
3/4 cup powdered sugar

Preheat your oven to 375 degrees. To make cookies, mix flour, cocoa, baking soda, and salt together and set aside. Using your mixer, beat together brown and white sugars, butter and 1/4 cup of creamy peanut butter for 1 - 2 minutes, until fluffy. Add the vanilla, beat well, and then the egg. Once well mixed, fold in flour mixture and mix until just combined.

In a separate bowl, mix together filling ingredients until well-combined.

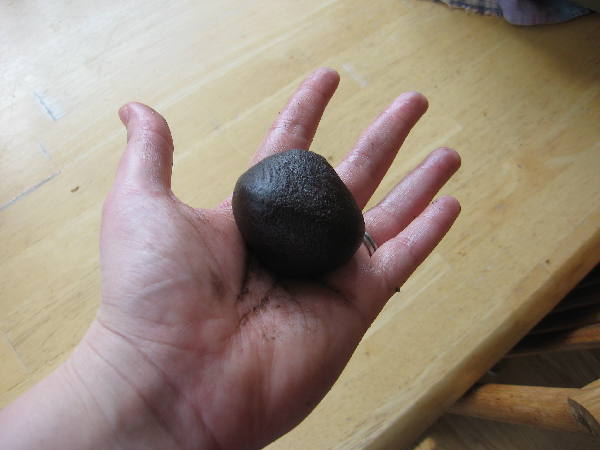
Now you're ready to combine the two! I'll warn you...this isn't pretty. First, pull off a hunk of your chocolate dough and flatten it in your hand, like this.

Next, take a spoonful of your peanut butter mixture and add it to the middle of your cookie.

Fold it over like a taco, seal the edges, and then roll it around in your hand until a ball is formed.

Then, smash it flat and toss it on your cookie sheet. You can make these as large or as small as you'd like. I think I got about 15 fairly large cookies from this recipe.

Bake for 5 - 7 minutes, until the bottoms are barely crisped. You don't want to overcook, because that will make your cookies hard. Remove from cookie sheet and cool on a wire rack.

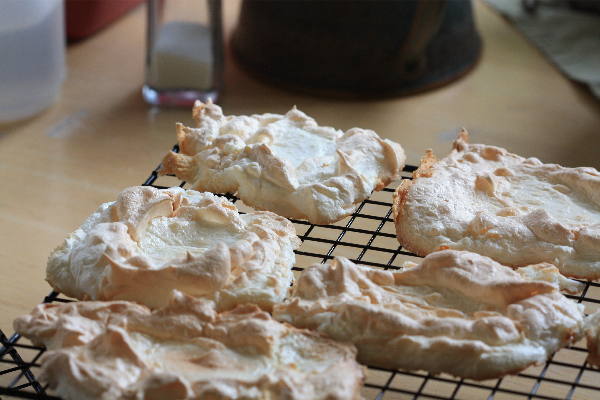
The finished cookies are never going to win a beauty contest...

...but they taste awfully good. The peanut butter filling is a nice sweet surprise.

I hope you'll give them a try this week.

Enjoy!

Tuesday, April 26, 2011

An Egg-cellent Day

I always keep my eyes open for seasonal milestones. The first leaves that change color in the fall. The first frost, and then the first real snowfall, in the winter. Spring, of course, has many milestones, and one of the important ones is finding the remnants of robin egg shells that have been flung out of the nests by clumsy baby birds.

It was easy to find the nest this particular egg had fallen from. Mama robin had built it a mere six feet off the ground. If you look closely, you can see her protectively huddled over her little ones.

Older nests sometimes fall from the trees. After a particularly windy night, this large nest was rolling around on the ground. Thankfully, it was empty.

Another spring milestone: my creeping thyme has finally bloomed!

It's a really lovely groundcover and even though the flowers are only in bloom for about 3 weeks in the spring, the low-growing green foliage is pretty in the summer, too.

The large lilac bush is in full bloom! Now I'm just waiting on my dwarf bushes to bud out. A solid six weeks of lilacs...I love it!

The fragrant blooms of this crabapple tree are all open, both on the branches, and in a drifting pink carpet below the tree.

The bradford pears are lovely...

...and our Indiana redbuds are providing a nice contrast.

Even my indoor plants are getting in the spirit. I'm terrible with house plants, but was happily surprised to see this cyclamen plant put up a few blooms.

Somehow, I'm even growing mushrooms in my snapdragon box, strange little white umbrellas that unfold and then collapse within a few hours, every single day.

I was motivated to make another Easter project with some of my hollowed-out eggs. I found this idea on the Poppytalk blog and thought it looked like fun.

Make sure your eggs are completely emptied and dried. Take some decorative paper and a hole punch, and punch out several 'dots' from each page.

Paint your egg any color you'd like. After it dries, take a small slip of paper, write your Easter message on it, and roll it up into a tiny scroll. Insert it into the egg through one of the holes you made when you hollowed it out.

Next, glue your dots onto the egg, taking care to cover up both hollowing-out holes.

Attach a card that lets people know what to do with the egg...

...and seal everything up with an Easter-themed stamp.

It was a lot of fun! I'm afraid that I rushed though the first step and my eggs weren't completely dry when I inserted the scroll. Lesson learned!

Besides decorating Easter eggs, I made the traditional hot cross buns to eat with our meal...

...and a new discovery - pavlovas. Pavlovas are a type of sweetened meringue topped with citrus curd, chocolate, or jam, and then smothered in fruit. They were so much fun to make!

Pavlovas
adapted from Good Life Eats
Makes 9 mini-nests


Ingredients
1 teaspoon vanilla extract
juice from half a lemon
2 teaspoons white vinegar
1 1/2 tablespoons cornstarch
1 1/4 cups sugar
6 ounces egg white (from 5 - 6 eggs)

Directions
Let your eggs sit in warm water for about 20 minutes to bring them to room temperature before separating them. While they're warming, preheat your oven to 250 degrees. When eggs are room temperature, separate them and add the whites to your mixing bowl. Mix on low for a minute, and then gradually increase speed.

Meanwhile, mix the sugar and the cornstarch together. Add to the egg white mixture after 2 - 3 minutes, when your meringue develops soft peaks. Increase speed and beat for an additional 2 minutes. Finally, add the vanilla, lemon juice, and vinegar, and beat at high speed for another 2 - 3 minutes, until the meringue is glossy and has stiff peaks.

I should have spooned the meringue into a pastry bag and piped delicate, nicely-shaped birds' nests on my greased cookie sheets. However, I had bread rising, and I was cooking lemon curd on the stovetop, and mixing up sugar cookies at the same time. For expediency's sake, I just plopped soft, pillowy dabs of meringue on my cookie sheet. They looked so pretty...

...but after cooking at 250 degrees for 45 - 40 minutes, they flattened a bit. Well, now I'll know for next time! Even though they were a little flat, they were a lovely color and consistency.

I topped each one with homemade lemon curd and a mixture of blueberries and raspberries. YUM!

We even squeezed in a backyard Easter egg hunt!

It was an EGG-cellent day, indeed, full of good food, good friends, and the knowledge that our Savior rose from the grave on this day, separating life from death and ensuring our salvation.

I hope you had a great weekend, too!