Showing posts with label layer cake. Show all posts

Tuesday, April 22, 2014

I "Mint" To Have Only One Slice!

Spring is flying by, and every day brings another little milestone.  Our ducks are back!


The trees, too, are filled with the sounds of songbirds.  We have an abundance of bluebirds, towhees, cardinals, phoebes, finches, and many others.  My favorite bird song is one that I hear all day long...that of the Eastern Towhee:


Thankfully, we haven't had as many deer sightings.  We still see them a few times a week, but nothing like the fall, when they willfully and maliciously decimated my garden.


Suddenly, all the trees around us have filled out...even our Japanese Maples.


My little hibernating houseplants that I cut back mid-winter have started showing new growth.


We're enjoying the last flush of azalea flowering...


...even Bosewichte!


New discoveries, like a clematis vine that did not flower the first year we lived here...


...and the first iris of spring.


Todd finished most of the leaf removal...


...and Borga has been soaking up the sun on the newly-uncovered lawn.


I've been toiling away at my little flower bed.  It probably took me close to a week, an hour or two at a time, to clear away the weeds.  It took me another week to dig up the space with my hand spade.  It was terribly difficult, because each spadeful brought up something like this:


The runners/root system of the weeds.  I despaired at ever getting them all up, but I put in two hours a day until they were finally cleared, at least to a depth of six inches.  I'll have to RoundUp any new shoots.  Meanwhile, I was able to get my seeds planted.  This year I went with my favorite "Indiana Annuals" mix:  tall spiky purple salvia mixed with pink coneflowers...feathery-leaved cosmos...cheerful zinnias...and a front bed of mixed marigolds.


It will be a battle with the established weeds, clay soil, iffy sunlight coverage, and possible drought conditions.  If these guys won't grow, nothing will!


In the past few weeks, I've made a nearly-forgotten layer cake...


..a batch of baked chocolate goodies I call "D'oh-nuts" for their resemblance to the sprinkles-covered doughnuts always seen on The Simpsons:


...and a multi-level ice cream cake...


...for my special birthday boy.


I "mint" to have just one slice, but I'm afraid we demolished over half the cake between the two of us in just one day.  It was delivered to Todd's office the next day for "safekeeping"!

Hope you're having a good week!


Tuesday, August 2, 2011

Glove Love

It always amazes me that squirrels in the yard let me get so close. Country squirrels are so skittish, but these city squirrels are little 'street toughs' and not afraid of a pesky human. This little fellow nosed around beneath my bird feeders...

...had a nibble...

...and then fixed me with a look that said, "I know you're here, and I don't care. I'm tough." At least, that's what I think it said. It also might fall into that 'blank stare' category.

I've seen some other really cool things in the garden lately. I was really interested in this little insect that looked like it was trailing toy stuffing from its bottom. It's a young Acanalonia bivittata, or in other words, a leafhopper nymph. These young leafhoppers brush their 'tails' forward to cover their bodies when they feel threatened. It helps to protect them until they get a little older and are better able to escape an enemy.

This one has just dropped his tail!

Another curiosity: this carpenter bee, which appears to have just had a major pollen binge and passed out in this false dragonhead blossom.

I was happy to see this American Lady butterfly (Vanessa virginiensis) on one of my bushes. I haven't seen many butterflies at all this summer. It's time for the tiger swallowtail caterpillars to be out and about, but I've only seen one tiny caterpillar.

When she opened up her wings, I could see that she didn't have much time left. Most butterflies only live three or four weeks, and when they develop these tattered wing tips, you know they're at the latter end of that time span.

She's still a beauty!

Here's an interesting creature! I saw these two mating insects - were they wasps? Hornets? Some type of bee?

I took note of his coloring and markings and later determined that he was an eastern cicada killer. They burrow into the ground and search out nesting cicadas before stinging them and laying their eggs within their bodies. I've been seeing these everywhere lately. Last week I was walking in the park with Todd and saw a cicada killer straddling a downed cicada on the sidewalk. The cicada killer stung the cicada repeatedly and then released a stream of venom into the air, like a nurse who pushes the air and extra medicine out of a syringe before administering an injection. Then the cicada killer grasped the cicada, who easily outweighed it, and carried it off to his den.

In more mundane news, my marigolds are finally blooming.

My cosmos, who've looked like this all summer:


..have started to look like this:

They're going to seed rapidly. Every other day, I have to deadhead the spent blossoms faithfully in order to get nice blooms through the fall.

In other news, I've indulged my rubber stamp addiction with a few more purchases from Nora Jane's etsy shop. I love her stamps, because they look so old-fashioned, and are reasonably priced.

I especially love the animals.

The stamps make beautiful, clear imprints on paper.

I love them!

Recently, I tried something new. I used a design that has a lot of white space...

...and used colored pencils to brighten it up a little. I like the result and am going to try watercolors next!

I finished my gloves and I'm really pleased with them. I like their stretchy, knobby look.

I knit up a matching hat with just a bit of yarn. I had just enough in one skein of the Misti Alpaca to make both hat and gloves. You can't beat that!

I'm looking forward to getting to wear them this winter!

I made a cake for a visiting friend a week or so ago. It's Dorie Greenspan's Perfect Party Cake. It didn't turn out quite like I'd hoped, but I was able to improvise.

First, the batter was supposed to make two 9" cakes that could be split in two to make four layers. But my layers were flat...really flat.

There's no way that those layers could safely be split. I had to make another batch (four cake rounds total) in order for the design to work.

I also made homemade buttercream frosting (3 sticks of butter!!) for the first time...heating the sugar and egg whites in a double broiler, whisking until cooked, then beating mercilessly with my KitchenAid until it resembled slick marshmallow cream. I had no trouble the night I made it, but when I took it out of the refrigerator to ice my cake, it looked like this:

I tried heating it up and whipping it again, but it was a complete loss. That's all right...I felt a little odd about eating so much butter, anyway. I made a basic cream cheese frosting instead.

So you stack your layers, with frosting and lemon curd (or jam) in between each layer...

...then ice the rest of the cake and press coconut into the frosting.

It was a lot of work, since I made the lemon curd from scratch and had to make 2 batches of cake and an extra batch of frosting. The cake is a basic white cake, so you can use a mix, your favorite recipe, or Dorie's recipe.

Dorie's Perfect Party Cake
Makes 2 9" cakes

Ingredients
2 1/4 cups cake flour
1 Tbsp baking powder
1/2 tsp salt
1 1/4 cups whole milk or buttermilk
4 large egg whites
1 1/2 cups sugar
2 tsp grated lemon zest
1 stick unsalted butter, softened
1/2 tsp lemon or vanilla extract

Preheat your oven to 350 degrees. Mix together your flour, baking powder, and salt. In another small bowl, whisk your egg whites and milk together. In another bowl, add your sugar and lemon zest. Mix together, pushing down on the zest, until the sugar is moistened. Add the butter and mix well. Add in the extract.

To this mixture, beat in half of the flour mixture and half of the egg mixture. Repeat and beat until well-combined.

Bake in greased and floured cake pans for about 30 minutes, or until golden brown. Assemble as described above.

For all the time it took, this really was one of the best cakes I've ever had. Cake + lemon curd + cream cheese frosting + coconut = sugar nirvana.


If you've got a special occasion coming up, I hope you'll give it a try!

Have a great week!

Tuesday, February 15, 2011

Be Mine, Valentine

Traditionally, I've never cared one way or another about Valentine's Day. It ranks well below Halloween and just barely above St. Patrick's Day on my radar. Yes, it's nice to acknowledge and to receive acknowledgment from your significant other, but the commercialism has always been a bit of a bother. This year, though, I felt inspired to embrace the season, in a major "do it yourself" way!

I love my husband. I mean, I'm really crazy about him. I risked arrest (or at least a fine!) in Italy a few years ago by, as tradition dictated, clamping a Todd-inscribed padlock onto a structure on the Ponte Vecchio and tossing the key into river below, ensuring that we'd have true love forever.

So far, so good (wink wink)!

This year I decided to make Todd a little book filled with expressions of my love. It took a while to make, but wasn't too difficult. I gathered a stack of same-size envelopes and cut two pieces of cardboard to size...

Then, with a nod to tradition, I stitched various red, white, and pink buttons in a heart shape onto a piece of neutral-colored fabric.

Once completed, I wrapped the fabric around the first piece of cardboard, secured it with pins, and embroidered a quick border.

Then, I did the same thing with the other side. Book cover and back completed!

Next, I determined how many envelopes I wanted for my book and laid them edge to edge, securing them with a piece of scotch tape.

I had quite a stack! If you decide to make these, make sure your envelopes aren't overfilled...I learned that the hard way. They won't lie flat and your book will be very untidy.

Now, to fill those envelopes! I filled mine with lots of little things. Some miniature cards...

...and some homemade ones. This one was so fun to make. Make concentric cuts into a heart shape, with a little "pull me" tag in the middle...

Secure the heart to your card. When the recipient pulls the tag, your message is revealed!

One envelope was filled with haikus I'd written in the traditional 5-7-5 meter. These were so fun! The paper I chose made the envelope too thick, however, so I ended up typing them out and filling my envelope with small slips of paper.

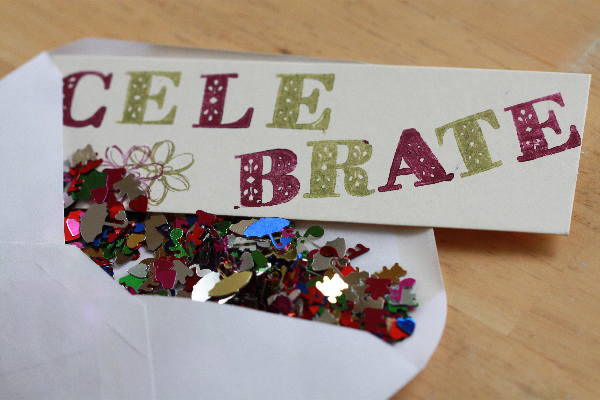
What's a celebration without confetti?

Since Todd and I have a great love of board games, I decided to use the ones we played most frequently to stage messages, which I then photographed and printed off on small 2 x 2 pieces of paper for one envelope.

Scrabble...

Royalty...

...and Boggle!

Many other little things filled the pages of my book, and I felt really happy when I surveyed my filled envelopes.

To finish off the book, I attached both covers by stitching a wide ribbon onto their edges.

I covered up the frayed fabric edges and the cardboard with card stock. If I would've had more time, I would've made it look a lot nicer, but I was on a deadline!

With his Valentine's Day card tucked into its front, this was a really happy little book that brought a lot of joy on the big day!

It was really fun.

Gift done, I had to decide what to make for "the big meal." Todd and I don't go out to eat very much since I really love to cook, and we didn't want to compete with Valentine's Day crowds. I decided to make something warm and filling - our favorite chicken noodle soup with homemade french baguettes and salad.

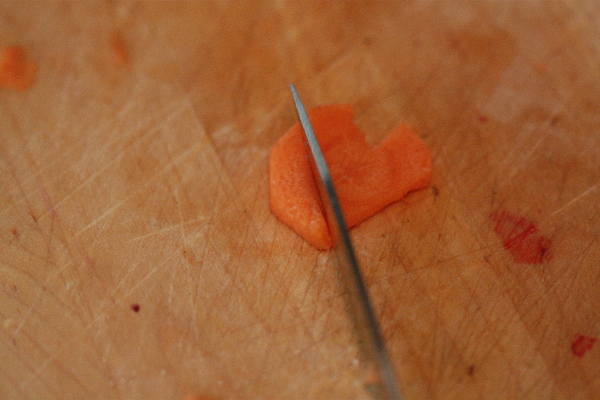
But it was Valentine's Day, so...carrot hearts!

I got this idea from last month's Martha Stewart Living. It didn't take much time at all. Peel and slice your carrots normally, and then you can use a cookie cutter to make the top of the heart on each carrot...even the really small ones!

Use a knife to chop off the sides and even up any sharp edges.

Then I decided, on the spur of the moment, to cut my potatoes into hearts, too.

It made a really warm, delicious meal, and it was so much fun to eat. Todd was absolutely amazed!

I'd been planning the dessert for about two weeks. It was a big project, inspired by I Am Baker's wonderful site. I was initially afraid to make this, thinking that I didn't have enough experience or that it would be just too much. I don't ever want to be afraid to try, though. I decided that I could whip up some quick molten chocolate cakes if this was a bust.

First, I made plain white cake and vanilla cream cheese frosting...four of them. When I had two stacks of layer cakes with a layer of icing between the two layers, I used these broken skewers to measure out identical circles on both stacks of layer cakes.

With one layer cake stack, I hollowed out the center in a cone shape, carefully saving the crumbs.

With the other, I made the same cone shape, but with a little upside-down 'v' shape in the center.

I combined the crumbs from both cake stacks, dyed them red with food coloring, and patted them into place securely.

Then I stacked the "v" cake on top of the cone cake. I gave it a crumb coat...

...and put it in the freezer until Valentine's Day.

When the big day arrived, I made another batch of cream cheese icing and fully iced the cake. It was meant to be all white, but I couldn't resist a few sprinkles along the edge of the cake.

Here it is, fully iced and ready to go...

And here's the surprise! When you cut into it, a heart appears!

My uneven sawing (what is the proper way to saw through 4 layers of cake?!) caused some cracking around the top of the heart, but overall, I was really pleased with how it turned out.

I hope everyone had a great Valentine's Day! These are fun ideas that aren't just limited to February 14th...they'd be great for birthdays, anniversaries, or other special days.

Enjoy!