Showing posts with label speedwell. Show all posts

Monday, March 17, 2025

spring things 2025

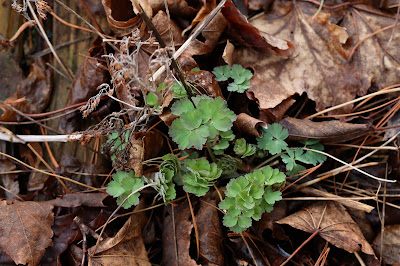
 There's a slow creep of green...

columbine

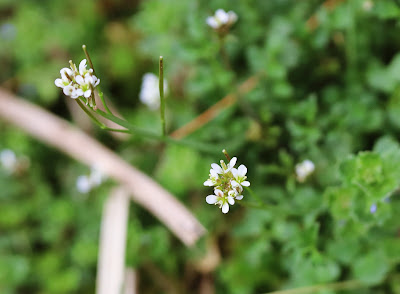
hairy rock cress

sedum

field speedwell

...and a bit of color too!  These daffodils were ready to POP earlier this week!


The best time to pick is just before they open up.


...because they open...


...fast!


We've got daylilies coming up too.


We had a big storm last week, and several trees were down....some completely uprooted.  A blooming elm tree was one such victim, but at least I got to pick some branches for another spring bouquet.

 
I love the flowers.


Almost a month later than planned, I finally got some sweet peas planted as well.


They're so easy.  No soaking, no nicking, no heat mats or special lights.  Put them in containers with damp soil...


...and put them in a cool, dark place.  In ten days, you'll have seedlings.  Calendar marked!

The warm weather turned our normally rambunctious kittens into drowsy, lazy cats.


The reprieve is kind of nice.  Maybe they're finally growing up!

Have a great week!  

P.S.  Check out the SPRING CHORUS at one of our favorite spring hiking locations, Bean Blossom Bottoms.  The spring peepers have been out in force in our pond and as soon as the water level recedes, we'll be heading to "BBB" to check it out!

Monday, July 11, 2011

Dough Re Mi...

I've learned some valuable lessons this week! Lesson #1: be very cautious about pruning hydrangea bushes. I didn't realize that the blooms grow on the old wood...so if you prune too aggressively, you might end up with one solitary blossom...like me. Thankfully, it should be back to normal next year.

Lesson #2: some plants just aren't 'meant to be.' I've tried to grow creeping jenny for three years, and I kill it every year. This year it took a record two days to shrivel up. Oh, well!

Lesson #3: always keep an eye out for rogue mantises. They're coming out of the woodwork...literally!

All mishaps aside, the garden is blooming nicely now. I'm just waiting on my marigolds and my rose of sharon bush.

The bees are out and about. Little honey bees...

...and larger carpenter bees are frantically gathering up pollen!

Other little creatures, like this grasshopper, are glimpsed from time to time.

In this hot weather, we like to get out in the early mornings for a relaxing walk in the park.

I love the butterfly garden there. Especially I love this spiky purple plant called a blazing star. They bloom all summer long and are really beautiful en masse.

Bees and butterflies love to delve into this little filaments!

Speedwell is also good for bees and butterflies, and so beautiful...

...and, of course, coneflowers.

They look so nice against the purple blazing stars.

Less showy but just as nice, an oak leaf hydrangea flowers in the shade nearby. The bushes can get quite large, but they're beautiful plants that are a nice change from hostas if you've got a large shady area to fill.

Acorns are ripening on oak trees...

...and the bees are taking advantage of the flowers! This hive died out over the winter, but was replaced this spring with a new, healthy colony. It looks like they're thriving!

This impressively-named Tawny Emperor butterfly (asterocampa clyton) lit briefly on this tree as we walked by. They don't hold still for long, though!

Despite the heat, I've been doing a fair amount of baking. One thing that used to intimidate me was pies, but really, they aren't hard at all! A homemade crust doesn't take much time and tastes so much better than store-bought. Here's my recipe and a quick tutorial!

All-Butter Pie Crust
Smitten Kitchen
One double- or two single-crust pies


2 1/2 cups all-purpose flour
1 tablespoon sugar
1 teaspoon salt
2 sticks butter, cold

Before starting, place several ice cubes into a cup of water. Go ahead and mix together your flour, sugar, and salt. Make sure your butter is VERY cold and dice it into small pieces. Use a fork or pastry cutter and cut your butter into the flour until the butter is pea-sized. Be sure not to overwork!

Now, take your ice water and slowly drizzle it over your flour mixture. You'll probably use about 3/4 cup total. Add 1/2 right away and gently mix. Add the additional 1/4 cup a tablespoon at a time.

Once you can mound your dough together, wrap it in plastic wrap and refrigerate it for an hour or so. See? That's not so bad! It takes less than 10 minutes to mix this up!

After the dough has rested, take it out and cut it in half. The key is to work with cold dough, so put one dough ball back in the refrigerator and just work with one at a time. Be very generous with your flour and roll out the dough until you've got a 12-inch circle. I use a 10-inch bowl and tack on an extra two inches, just cutting around with a knife. I was an inch short in this example but it worked just fine for me. Don't throw away those dough scraps! I've got a great recipe for using them up next week.

Place your dough in the pie pan...

...and crimp the edges with your fingers.

Stab the bottom with a fork a few times and bake at 325 for 15 - 20 minutes, until firm. Look at the flaky layers!

I chose to fill this particular pie with strawberries...

...and make a simple strawberry pie. No additional baking needed and it's delish!


I hope you take some time out to bake this week. Enjoy!

Tuesday, March 29, 2011

Padding, Pillows, and Plenty of Pudding

Before our current cold snap, I was able to get out in the yard and get some much-needed work done...under careful supervision, of course.

My sister brought over a big load of rich, healthy compost, which I'll till into our poor soil soon to add some much-needed nutrients.

Everything seemed to come to life at once. My autumn sedums look like miniature lettuce heads. They'll make a beautiful display in September.

I found another nice natural groundcover. This is persian speedwell...tiny blue flowers that spread in bright patches in our yard.

Blue is such a lovely color in the garden!

The columbines are making great headway. I expect to see stalks within two weeks.

Not to be outdone, the lilacs are showing bright green leaves all over. I simply can't wait until they bloom! I have the most beautiful bouquets in nearly every room in the house.

I found evidence of past life...some insect spent some time here in the fall!

Best of all, though, I found evidence of future life: the ground under our big pine tree is littered with tiny bits of fuzz, which the birds nesting above have dropped from their nests.

Lots of activity inside, too. Single flowers make beautiful displays in egg cups, assisted by a few pebbles within to help the stems stay upright.

Besides flowers, I've been thinking of more ways to bring some bright color into the house. I recently bought this pillow at IKEA for, I believe, around $10. I wanted to buy more, especially the blue plaid counterpart, but that could get expensive pretty quickly. How hard could it be to make my own? As it turns out, making a pillow is incredibly easy.

I found a man's button-up shirt at a thrift store that I thought would work nicely. Cost: .75.

I found an ugly old pillow that the cats had been kicking around on the front porch. Origin: unknown. Cost: free.

I placed the pillow on top of the spread-out shirt...

...and cut out around the pillow, making sure to leave a wide margin on all sides. I should've left a wider margin, but that was easily solved by removing the cover from the brown pillow to make it a better fit.

Then, I turned the shirt inside-out and simply stitched around the edges, making a nice, even square. I did this by hand, which took less than an hour. If you use a sewing machine, this would take mere minutes.

After your pillowcase is sewn, unbutton the shirt and turn it right side-out. Slip in the stuffing (or the pillow you're covering) and button the shirt up again.

Ladies and gentlemen, that's a pillowcase!

Or, if you prefer the flip side:

I'm really pleased with this less-than-$1 DIY project. The two pillows are complementary, I think, and make a good pair. I'm envisioning a whole stack of beautiful plaid pillows. All I need is a thrift store shirt!

I can't wait to go back!

My knitting needles have been clacking along, albeit slowly. I haven't had too much time to work on my cardigan, and certainly a sock yarn-weight cardigan takes much longer to knit than one knit with the typical DK- or worsted-weight yarn. I'm pleased with the way it's turning out, although I'm still a bit nervous about the modifications I'm making: lengthening the body, raising the neckline, and lengthening the sleeves, not to mention the size and gauge guesses. I will make it work somehow! I think it will be a perfect cool-weather cardigan.

Of course, I've been very busy in the kitchen as well. We just finished off the last of the coconut cream cupcakes, and my homemade butterscotch pudding with carmelized bananas and homemade whipped cream only lasted 2 days. But I did have time for another sweetie...any excuse to use my new tart pans!

From-Scratch Chocolate Pudding Tarts
Adapted from food.com
Serves 4


Pudding
1/4 cup cocoa
1/4 cup sugar
3 tablespoons cornstarch
1/8 teaspoon salt
2 cups milk
1 teaspoon vanilla

Crust
1 1/2 cups graham cracker crumbs
1/4 cup sugar
4 - 6 tablespoons butter, melted

To make the crust, preheat your oven to 375 degrees. Mix all ingredients together and then carefully press into your pie or tart pan. Bake for 5 - 7 minutes.

For the pudding, mix all ingredients but the milk and vanilla together, and then add milk. Whisk until fully combined, and then microwave uncovered for 3 minutes.

Stir.

Then you'll continue to microwave in one minute increments, stirring after each minute. You'll notice after 4 or 5 rounds that a thick brown "skin" covers more and more of the pudding's surface each time. I usually stop once there's just a small bit of light brown remaining in the center.

Mix in the vanilla, and you're done! Note: if you like a sweeter pudding, add 1/3 cup sugar instead of 1/4 cup sugar. I just prefer the "darker" taste of a less-sweet pudding.

Spoon the thickened pudding onto the graham cracker crust and refrigerate.

YUM! These cool in a few hours and are ready to eat. They're absolutely delicious. I've been making the homemade pudding for years - I'll never go back to the powdered stuff! - but this is the first time I thought to pair it with a graham cracker crust.

It's a good match.

You'll notice that I don't have a photo of the tart out of the pan and ready to eat...a certain someone likes these a little too much, I think! They didn't last long enough to photograph. That's all right...it's quick and easy to make more!

I hope you'll give them a try. Have a great week!